Ultimate Guide · 10 min read · June 26, 2026
First Fermentation to Bottling Day: The Complete Home Kombucha Brewing Guide
Whether you're eyeing your first SCOBY hotel or fine-tuning the fizz in your hundredth bottle, the journey from raw sweet tea to a perfectly carbonated kombucha follows a clear, repeatable process. The U.S. kombucha market was estimated at $1.62 billion in 2024 and is projected to grow at a 13.6% CAGR through 2030 [1], and much of that enthusiasm is showing up right in people's kitchens. This guide walks you through every stage — from first fermentation (F1) to bottling day and beyond — with the safety guidelines, timing windows, and flavor secrets that experienced home brewers rely on.
- What F1 actually does: First fermentation converts sweet tea into kombucha by feeding the SCOBY; it typically runs 7–14 days depending on temperature, starter-tea strength, and your taste preference.
- Safe pH window: Finished kombucha should reach a pH of 2.5–3.5 before bottling; the FDA Model Food Code requires a pH ≤ 4.2 to classify it as a non-potentially hazardous food [2].
- Ideal temperature range: The sweet spot for both F1 and F2 is 74–84 °F (23–29 °C); cooler kitchens dramatically slow fermentation [3].
- Second fermentation builds the fizz: F2 is a sealed-bottle stage (1–4 days) where added sugar and fruit feed yeast, producing CO₂ carbonation.
- Flavor is endlessly customizable: The Big Book of Kombucha by Hannah Crum and Alex LaGory includes more than 268 unique flavor combinations [4] — proof that F2 is where creativity lives.
- Batch tracking matters: Missing a pH reading or losing track of brew days is one of the most common reasons a batch turns over-vinegary, flat, or develops off-flavors.
| Stage | Duration | Temp | Key Goal | Safety Check |
|---|---|---|---|---|
| F1 (Primary) | 7–14 days | 74–84 °F | SCOBY feeds; tea acidifies | pH ≤ 3.5 at harvest |
| Bottling / Transfer | Same day | Room temp | Remove SCOBY; reserve starter tea | Taste + pH strip |
| F2 (Secondary) | 1–4 days | 74–84 °F | Carbonation + flavor infusion | Burp bottles daily |
| Cold Crash & Fridge | 12–24 hrs | 34–38 °F | Lock in fizz; halt fermentation | Check for pressure |
TL;DR: Nail your F1 with the right temperature and starter-tea ratio, measure pH before you bottle, then let a short F2 build the carbonation — and you'll have great kombucha every single time.
Understanding First Fermentation (F1): Laying the Foundation
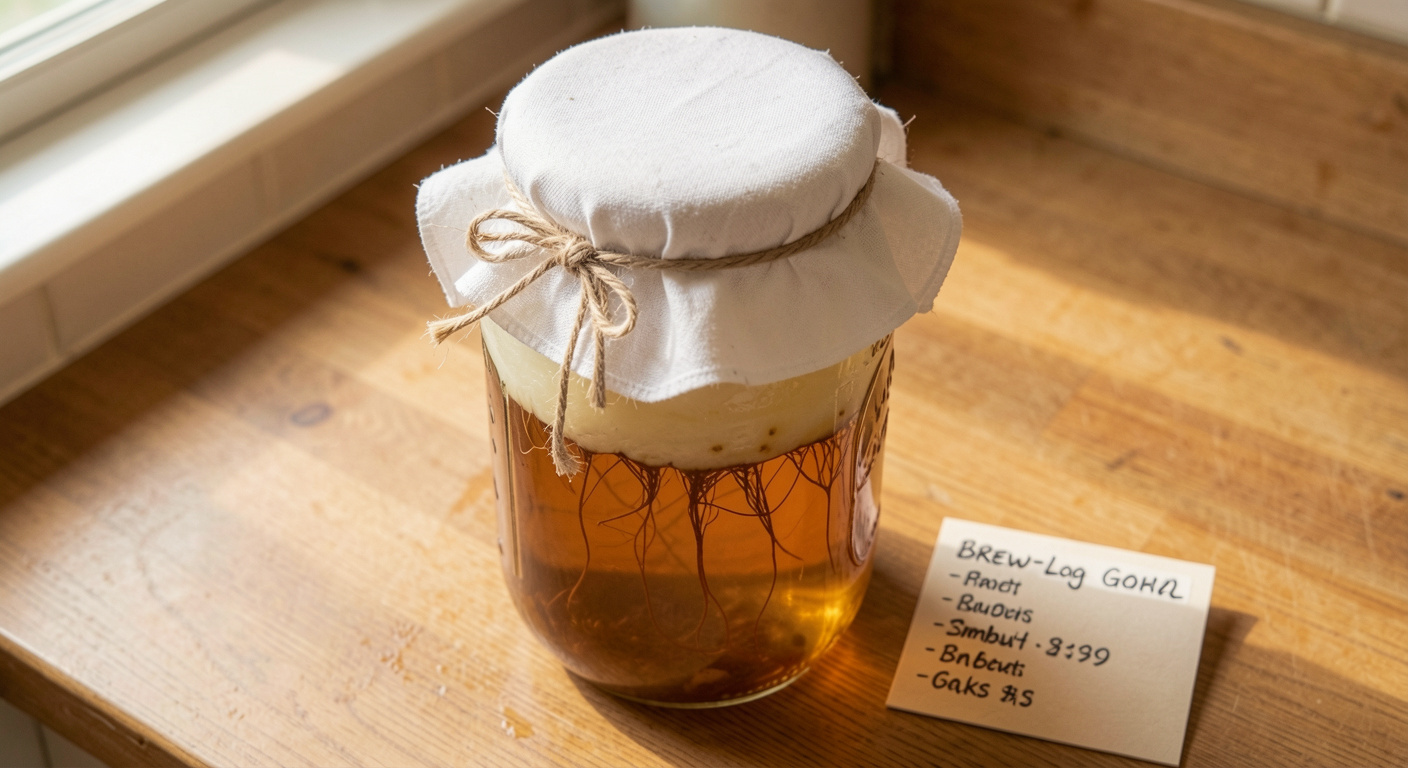
F1 is the stage that transforms plain sweet tea into kombucha. A SCOBY (symbiotic culture of bacteria and yeast) floats in a brew vessel filled with sugared black or green tea, consuming the sugar and producing organic acids, trace alcohol, and B vitamins.
The Essential F1 Ingredients
Your four ingredients are simple, but quality matters:
- Tea — Unflavored black tea (or green tea) feeds the bacteria and yeast with nutrients they need. Flavored teas or teas with added oils can weaken or kill a SCOBY.
- Sugar — Plain white cane sugar is the gold standard for consistent fermentation. Honey, maple syrup, and turbinado can work but may produce unpredictable results for beginners.
- Starter tea — Finished, unflavored kombucha (from your last batch or a store-bought raw bottle) acidifies the new batch immediately, which is your first line of defense against contamination [2].
- SCOBY — The rubbery culture that holds the bacterial colonies. A healthy SCOBY is cream to tan in color, firm, and may have hanging brown yeast strands — those are normal and beneficial.
A standard ratio to start with: 1 cup of white sugar, 8 bags of black tea, and 2 cups of starter tea per gallon of water.
F1 Timing and Temperature
Kombucha Kamp — the authority founded by Hannah Crum and Alex LaGory, authors of The Big Book of Kombucha [4] — notes that "some brews can taste pleasant at ~5 days in a warm kitchen, but most people prefer 7+ days." [5] Cooler temperatures, weaker starter tea, and low yeast activity all slow fermentation. Here is what to expect at each stage:
- Days 1–3: The SCOBY begins forming a new layer on the surface. The liquid is still quite sweet. Do not disturb the brew.
- Days 4–6: Acidification is underway. A distinct tangy aroma develops. A thin new SCOBY layer will be visible on top.
- Days 7–10: This is the typical harvest window. The brew should taste lightly sweet, moderately acidic, and slightly vinegary without being sharp [3].
- Days 10–14+: Fermentation continues and the kombucha becomes increasingly acidic. Some brewers deliberately go long for a more vinegary "starter tea" base [3].
"Fermentation should very much be a hands-on process that helps you connect to the foods that you are eating." — Kombucha Kamp [5]
The ideal fermentation temperature for F1 is 74–84 °F [3]. Below 70 °F, bacteria become sluggish; above 85 °F, you risk producing too much acetic acid (vinegar) too quickly.
Measuring pH: Your Safety Net
Reaching the right pH before you bottle is not optional — it is a food-safety requirement. According to an FDA Model Food Code analysis published by Happy Herbalist, "bottling kombucha at a pH ≤ 4.2 will ensure no pathogen growth." [2] In practice, well-fermented kombucha finishes between pH 2.5 and 3.5 [6]. An inexpensive pH strip or digital meter is one of the most valuable tools in a home brewer's kit.
| pH Reading | What It Means | Action |
|---|---|---|
| > 4.2 | Under-fermented / unsafe to bottle | Continue F1 |
| 3.6 – 4.2 | Mild, lightly sour | Bottle if desired; monitor |
| 2.5 – 3.5 | Ideal finished range | Ready to bottle |
| < 2.5 | Over-fermented, very tart | Use as starter tea only |
If you notice anything fuzzy, brightly colored, or dry on top of your SCOBY, stop before bottling. What looks alarming is often harmless brown yeast strands, but distinguishing them from actual mold is crucial — see our detailed breakdown in Mold vs. Yeast Strands: How to Tell If Your Kombucha SCOBY Is Actually Ruined.
Bottling Day: The Transfer That Makes or Breaks Your Batch
Bottling day is the inflection point between a basic fermented tea and a finished, fizzy beverage. Approach it with clean hands, sanitized equipment, and a plan.
How to Transfer F1 Kombucha
- Sanitize everything. Rinse your bottles, funnel, and hands with plain white vinegar or food-safe sanitizer. Soap residue can kill beneficial bacteria.
- Remove the SCOBY and starter tea. With clean hands, lift out the SCOBY and set it aside with 1–2 cups of liquid (this becomes your starter tea for the next batch). Keep it covered.
- Measure your pH. Dip a strip or probe into the finished kombucha. If it reads above 4.2, let the batch continue fermenting; do not bottle yet [2].
- Taste the brew. Trust your palate. A balanced F1 kombucha is tart but not harsh, slightly effervescent (natural CO₂ from fermentation), and has a clean "kombucha" smell — not rotten or sulfurous.
- Pour into bottles. Swing-top (Grolsch-style) glass bottles or repurposed store-bought kombucha bottles with tight lids work best. Fill to within 1–2 inches of the top to leave headspace for CO₂.
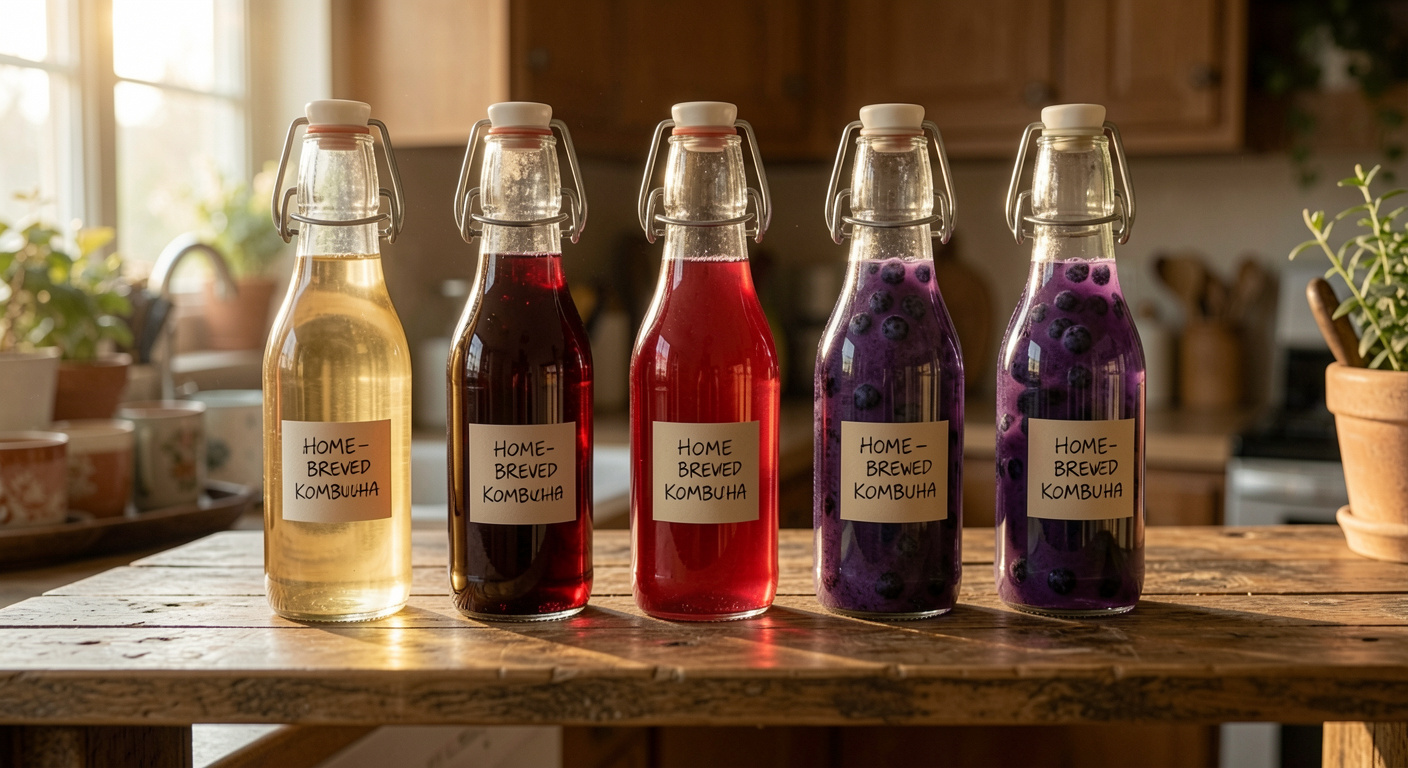
Adding Flavors for Second Fermentation
This is the moment creativity enters the picture. Second fermentation (F2) is a short, sealed-bottle stage where added sugar — usually from fruit juice, fresh fruit, or honey — feeds remaining yeast, producing CO₂ that carbonate the kombucha [3]. The Kombucha Brewers International Code of Practice confirms that kombucha typically has a pH range of 2.3 to 3.8, and a lively F2 keeps it well within that safe zone [6].
Popular and proven F2 additions:
- Ginger + lemon (classic; the ginger starches and natural sugars drive vigorous carbonation)
- Fresh or frozen blueberries + lavender
- Mango + turmeric + black pepper
- Apple + cinnamon + clove (perfect for fall brewing)
- Hibiscus + rose hip (gives a deep ruby color and floral tartness)
For over 268 creative flavor combinations and exact ratios, check out our post on 10 Creative Second Fermentation Flavor Recipes You Can Brew Right Now.
"Expert brewers Hannah Crum and Alex LaGory reveal how easy, inexpensive, and safe it is to make your own delicious kombucha, with instructions for batch and continuous brewing." — Amazon listing for The Big Book of Kombucha [4]
Second Fermentation (F2): Building Carbonation and Flavor
F2 is where home brewing gets both exciting and technical. Sealed bottles trap CO₂ produced by active yeast, creating natural carbonation. Get it right and you have crisp, effervescent kombucha; get it wrong and you have either flat tea or, on the other extreme, a geyser.
F2 Timing and Temperature
The same temperature range that governs F1 applies to F2: 74–84 °F [3]. Warmer kitchens (toward 84 °F) can produce full carbonation in as little as 24–36 hours; cooler kitchens (around 68–72 °F) may need 3–4 days. Key rules:
- Burp your bottles once or twice daily. Open each bottle slightly to release a small amount of pressure and check carbonation. This prevents over-pressurization and bottle explosions, especially with thick-walled glass flip-tops.
- Use a "tester" plastic bottle. Fill one small plastic bottle alongside your glass ones. When the plastic bottle feels firm/rigid, carbonation is ready across all bottles.
- Don't add too much sugar. A tablespoon of juice per 16 oz bottle is a starting point. More sugar = more CO₂ = more explosion risk.
Cold-Crashing and Refrigeration
Once carbonation is where you want it, move all bottles to the refrigerator immediately. Cold temperatures (34–38 °F) dramatically slow yeast activity, effectively locking in the fizz. Let bottles cold-crash for at least 12–24 hours before opening for the first time. The flavor also mellows and integrates beautifully after a cold rest.
If your F2 isn't producing any carbonation at all, the causes are usually low sugar addition, too-cold ambient temperature, or a batch with very little remaining yeast activity. For a complete troubleshooting breakdown, see Flat Kombucha Fix: Why Your Second Fermentation Isn't Carbonating (and How to Fix It).
Common Problems and How to Diagnose Them
Even experienced brewers hit snags. Here is a quick-reference guide to the most common issues:
Over-Vinegary or Too-Sour Kombucha
A batch that tastes sharply of vinegar has simply fermented too long or at too high a temperature. The acetic acid bacteria have converted more alcohol into acetic acid than your taste prefers. Solutions:
- Shorten F1 to 7 days and keep the fermentation area below 80 °F.
- Blend the over-sour batch with fresh sweet tea in a 1:3 ratio and re-ferment briefly.
- Use the over-sour batch as starter tea for your next brew — it is perfectly safe and actually ideal for acidifying a new batch quickly [5].
Flat or Under-Carbonated Kombucha
Flat F2 is nearly always a sugar or temperature issue. Make sure your bottles are properly sealed (flip-top gaskets wear out!), the room is at least 70 °F, and you are adding a fermentable sugar source — not just tea. Check that your pH is in the safe zone, as very low pH (< 2.5) can inhibit yeast activity too [6].
SCOBY Health Issues
A healthy SCOBY is firm, opaque, and cream to tan in color. Brown yeast strands hanging beneath it are completely normal — these are the yeast colonies doing their job. True mold is fuzzy, raised, and often blue-green, black, or pink, and will appear on the top surface, not beneath the liquid. If you see genuine mold, discard the entire batch including the SCOBY and start fresh with a new culture.
| Appearance | Likely Cause | Safe? |
|---|---|---|
| Brown/dark strands hanging below | Yeast strands | ✅ Yes — totally normal |
| Cream/tan rubbery layer on top | New SCOBY growth | ✅ Yes |
| White film on liquid surface | Kahm yeast (harmless) | ⚠️ Usually yes; taste test |
| Fuzzy blue-green or black spots on top | Mold | ❌ No — discard everything |
| Pink or orange fuzzy patches | Mold | ❌ No — discard everything |
Tracking Batches: The Missing Piece for Most Home Brewers
The single most common reason a home brewer struggles — too sour, under-carbonated, lost track of brew days — is the absence of a simple tracking system. Logging the date you started F1, the pH at transfer, the flavors added, and the F2 duration is the difference between accidentally reproducing a great batch and never knowing why it worked.
That is exactly the gap KombuVault was built to fill. The app lets you log F1 start dates, set pH reminders for bottling day, record your exact F2 flavor ratios, and get push notifications when it's time to burp your bottles or move to the fridge. You can share your flavor recipes with a community of brewers, learn what's working in other people's kitchens, and build a personal brew journal that actually helps you improve batch after batch. Whether you need a kombucha brewing app to keep your batches on track or just want a community of fellow fermenters to swap tips with — KombuVault is the home base your brewing habit deserves.
Frequently asked questions
How long should first fermentation (F1) take for home-brewed kombucha?▾
Most home brewers harvest their F1 kombucha between 7 and 14 days. Days 7–10 is the typical sweet spot for a balanced, lightly tart brew. Cooler kitchens slow fermentation, while warmer rooms (close to 84 °F) can produce a ready brew in as few as 5–7 days. Always taste the kombucha and measure pH before bottling — a finished F1 should read between 2.5 and 3.5 on a pH strip.
What is the safe pH range for home-brewed kombucha?▾
Finished kombucha should have a pH between 2.5 and 3.5. The FDA Model Food Code requires a pH at or below 4.2 to classify kombucha as a non-potentially hazardous food. Measuring pH with an inexpensive strip or digital meter before you bottle is one of the most important safety steps in home brewing.
What temperature is best for fermenting kombucha at home?▾
The ideal temperature range for both first and second fermentation is 74–84 °F (23–29 °C). Temperatures below 70 °F slow fermentation significantly and can stall carbonation in F2. Avoid temperatures above 85 °F, which can cause the acetic acid bacteria to overproduce vinegar-flavored acids too quickly.
How do I know if my SCOBY is healthy or has mold?▾
A healthy SCOBY is firm, opaque, and cream to tan in color. Brown or dark strands hanging beneath it are normal yeast colonies — not mold. True mold appears as fuzzy, raised patches (often blue-green, black, or pink) on the top surface of the SCOBY or liquid. If you see genuine mold, discard the entire batch and SCOBY and start fresh.
Why is my second fermentation kombucha flat?▾
Flat F2 usually comes down to three causes: insufficient fermentable sugar added to the bottles, too-cold ambient temperature (below 70 °F), or sealed bottles that aren't truly airtight (check flip-top gaskets). Make sure you are adding a sugar source (fresh fruit, juice, or a small amount of cane sugar), keep bottles at room temperature for 1–4 days, and use the plastic-bottle trick to gauge carbonation before opening glass bottles.
How much starter tea should I use for a new batch of kombucha?▾
A general rule is 10–20% starter tea by volume — about 1–2 cups per gallon of sweet tea. The starter tea is critical because it acidifies the new brew immediately, creating an environment hostile to harmful bacteria. Use finished kombucha from your last batch (or raw store-bought kombucha) as your starter tea, and never skip it.
Sources
- U.S. Kombucha Market Size, Share | Industry Report, 2030 — Grand View Research
- Kombucha Brewing Under the FDA Model Food Code: Risk Analysis and Processing Guidelines — Happy Herbalist
- How Long Does Kombucha Ferment? (F1 and F2 Timing Guide) — The Ferment Guide
- The Big Book of Kombucha: Brewing, Flavoring, and Enjoying the Health Benefits of Fermented Tea — Amazon
- How Long to Brew Kombucha? Fermentation Time — Kombucha Kamp
- Kombucha Code of Practice — Kombucha Brewers International
Keep reading
Ready to brew a batch worth sharing?
Get KombuVault free →